.jpg)


How to Move WordPress Blog Contents to Blogger Blog
Content creators often explore new platforms to expand their reach. If you've been running a WordPress blog and are now considering a move to Blogger (also known as Blogspot), this guide will walk you through the process step by step. Whether it's about retaining your hard-earned SEO rankings or maintaining the aesthetic appeal of your content, this transition can be smooth with the right approach. Change the blog platform from WordPress and Blogger or vice versa it is called "migration". Here's how to move content, content, or blog posts from WordPress to a blog on Blogger (Blogspot).
There are many reasons for moving blog platforms from WordPress to Blogger. The main reason is usually the security of blog content data. At Blogger, we are Google's free hosting. Data is safe as long as we don't delete the blog.
Moving your WordPress blog to Blogger might seem daunting, but with careful planning and execution, it can be a rewarding transition. Remember to keep a close eye on the post-migration phase, fixing any broken links, and optimizing the new platform's settings for SEO. This move can breathe new life into your blogging journey while retaining your hard-earned audience and search engine rankings. For more in-depth guidance on Blogger customization or SEO optimization, check out resources like Blogger Help Center or Moz. Happy blogging!
Why Move from WordPress to Blogger?
Before we dive into the technical aspects, let's quickly understand why you might consider moving from WordPress to Blogger:1. Simplicity and User-Friendly Interface
Blogger is renowned for its straightforward and intuitive interface. It's designed to be user-friendly, especially for those who are new to blogging or website management. The simplicity of Blogger allows users to focus on creating content without the need for extensive technical knowledge or coding skills. This is particularly beneficial for individuals who want a hassle-free blogging experience.2. Cost-Effective Solution
While WordPress itself is free, hosting costs can add up, especially for bloggers who want more control and customization. On the other hand, Blogger is hosted by Google for free. This means you don't have to worry about paying for hosting services or domain registration. This cost-effective nature can be appealing to those who are budget-conscious or just starting out in the blogging world.3. Integration with Google Services
Blogger is seamlessly integrated with various Google services, which can streamline your blogging experience. If you're already using Google products like Google AdSense for monetization, Google Analytics for website statistics, or even Google Drive for media storage, the transition to Blogger can be remarkably smooth. This integration can save time and effort by eliminating the need to set up third-party integrations.4. Quick Setup and Getting Started
Blogger simplifies the initial setup process. Creating a new blog can be done in a matter of minutes. It involves a few basic steps, such as selecting a blog name and address. This ease of setup can be especially attractive to those who are eager to jump into blogging without dealing with the complexities of domain configuration and hosting setup that can come with self-hosted WordPress sites.5. Ideal for Personal and Small Blogs
Blogger is often considered an excellent choice for personal bloggers, hobbyists, or those who want a platform for expressing their thoughts without the need for advanced features. Its uncomplicated interface and limited set of features can actually be a boon for bloggers who want to focus primarily on content creation and don't require extensive customization or advanced plugins.6. Stability and Security
Since Blogger is managed by Google, you can expect a certain level of stability and security. Google's infrastructure is designed to handle high levels of traffic and to protect against security threats. While WordPress also has a robust security ecosystem, Blogger's association with Google can provide peace of mind to bloggers concerned about the technical aspects of website management.7. Google's Authority and SEO Benefits
Google owns Blogger, which means there might be some inherent search engine optimization (SEO) benefits. While Google doesn't officially give Blogger sites preferential treatment in search rankings, the fact that it's owned by Google might lead to quicker indexing and potential visibility advantages, especially for newer blogs.Step-by-Step Guide to Moving Your Content
Step 1: Backup Your WordPress Content
Before you begin any migration process, safeguard your content:- Install a backup plugin like "UpdraftPlus" or "All-in-One WP Migration" if you don't have one.
- Run a complete backup of your WordPress website, including all posts, pages, images, themes, and plugins.
- Save the backup files in a secure location, either on your local computer or cloud storage.
Step 2: Export Your WordPress Content
Exporting WordPress Content with the Export to Blogger Plugin
The Export to Blogger plugin is a handy tool that simplifies the process of moving your WordPress content to a Blogger blog. This plugin ensures that your posts, pages, comments, and other essential content are transferred seamlessly. Here's a step-by-step guide on using this plugin for a smooth migration:1. Install and Activate the Plugin

With this WordPress plugin, you can easily export WordPress data to Blogger(Blogspot). No need to use software and convert by yourself anymore! This plugin exports dedicated xml files directly, so what you need is just import it to Blogger.
- Log in to your WordPress dashboard.
- Navigate to the "Plugins" section and click on "Add New."
- Search for "Export to Blogger" and click "Install Now" on the plugin developed by the official WordPress team.
- Once installed, click "Activate" to make the plugin functional.
- After activation, you'll see a new tab named "Export to Blogger" in your WordPress dashboard.
- Click menu Setting > Export to Blogger
- Click on it. The plugin will prompt you to authorize the connection between your WordPress and Google accounts.
- Once authorized, the plugin will display a list of your WordPress posts and pages.
- You can choose to export all content or select specific posts/pages.
- It's recommended to export everything to ensure a comprehensive transfer.
- The plugin offers several options for exporting content, such as comments and images.
- Configure these settings according to your preferences. For instance, you can choose to export images along with your posts.
- Click the "Start Export" button. The plugin will start creating an export file in XML format.
- Once the export is complete, you'll receive a download link for the XML file.
- Download this file to your computer. This XML file contains all the content you're moving to Blogger.
Step 3: Create a New Blogger Blog
Before importing your content, you need to set up your new Blogger blog:- Sign in to your Google Account. If you don't have one, create a Google Account.
- Visit Blogger and sign in using your Google Account.
- Click on the "New Blog" button to start the blog creation process.
- Choose a title for your blog and a suitable URL address. This URL will be a subdomain of blogspot.com, but you can also use a custom domain if you prefer.
- Select a template from the available options. You can customize the template later according to your preference.
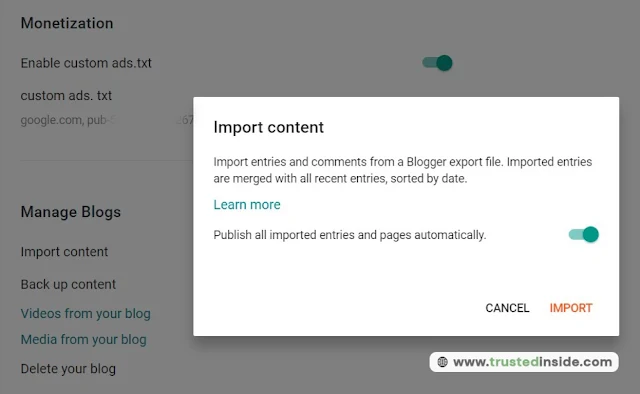
Step 4: Import Content to Blogger
Now it's time to bring your WordPress content into Blogger:- Log in to your new Blogger dashboard.
- Navigate to "Settings" on the left-hand menu and search "Manage Blogs"
- Click on "Import content"

- Click the "Browse" button and select the XML file that you exported from WordPress.
- Click "Import" to initiate the content import process. Blogger will start importing your posts, pages, comments, and other content from the WordPress export file.
Step 5: Review and Adjust
After the import process is complete, review your content:- Go through your posts and pages to ensure that the content has been imported accurately.
- Check for any formatting issues or missing images. Blogger might interpret formatting slightly differently than WordPress.
- Manually adjust any broken formatting, missing images, or formatting inconsistencies that might have occurred during the import process.
Step 6: Set Up Permalinks
Permalinks are the URLs that point to your individual posts and pages. Make sure they match your WordPress structure:- In your Blogger dashboard, go to "Settings" and select "Search preferences."
- Under "Permalinks," choose a custom structure that matches your WordPress permalink structure. This helps maintain your SEO rankings and ensures that old URLs still work.
Step 7: Redirect Your Old WordPress URLs
To prevent broken links and maintain your SEO rankings, set up URL redirects:- Install the "blogger to WordPress" redirection plugin on your WordPress site.
- Configure the plugin to create 301 redirects from your old WordPress URLs to the corresponding new URLs on your Blogger blog.
- Test the redirects to ensure they're working as expected.
Moving your WordPress blog to Blogger might seem daunting, but with careful planning and execution, it can be a rewarding transition. Remember to keep a close eye on the post-migration phase, fixing any broken links, and optimizing the new platform's settings for SEO. This move can breathe new life into your blogging journey while retaining your hard-earned audience and search engine rankings. For more in-depth guidance on Blogger customization or SEO optimization, check out resources like Blogger Help Center or Moz. Happy blogging!
"The only way to make sense out of change is to plunge into it, move with it, and join the dance." - Alan Watts